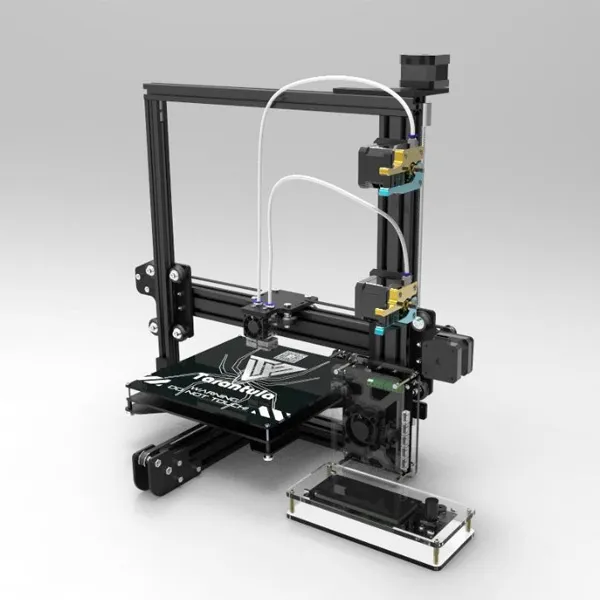
Tevo Tarantula Pro: 5 Quick Start Tips
The Tevo Tarantula Pro is a popular and affordable 3D printer, perfect for beginners and experienced makers alike. Getting started with 3D printing can seem daunting, but with these 5 quick start tips, you’ll be printing your own creations in no time. From bed leveling to post-processing, we’ll cover the essential steps to get you up and running. This guide assumes you have already unboxed and assembled your Tevo Tarantula Pro 3D yazıcı. If not, consult the manual or online resources for assembly instructions. Let’s dive into the world of 3D printing and unlock your creative potential with the Tevo Tarantula Pro.
Leveling the Bed for Perfect Prints
Bed leveling is arguably the most critical step in achieving successful 3D prints. A properly leveled bed ensures that the first layer of your print adheres correctly, preventing warping and other print defects. The Tevo Tarantula Pro comes with either a manual bed leveling system or an auto-leveling feature. Both methods aim to achieve the same goal a perfectly flat printing surface. Ensuring your bed is level is the most important step in creating the perfect prints.
Understanding Bed Leveling Basics

With manual leveling, you’ll use the leveling screws located on each corner of the print bed. You’ll need to adjust these screws while a piece of paper is between the nozzle and the bed, until there is a slight drag on the paper. This ensures the nozzle is the correct distance from the bed across the entire surface. For the best result, heat your bed to the temperature you intend to use for printing. Then, re-level the bed after it heats up, as the bed may warp slightly during heating. A properly leveled bed gives the perfect base for the first layer.
Using the Auto-Leveling Feature
If your Tevo Tarantula Pro has auto-leveling, the process is simplified. After the printer homes, it will use a sensor to map the bed’s surface and compensate for any imperfections. You still need to ensure that the nozzle is at the correct distance from the bed. The auto-leveling feature will handle the rest. Before printing, run the auto-leveling routine. Check the results of the auto-leveling process. If the nozzle seems too far or too close to the bed in any location, adjust the Z-offset in the printer’s settings. The Z-offset will ensure your first layer sticks to the bed and is perfect. Regular calibration can improve the printing quality.
Loading Filament Correctly
Next, you need to load the filament into your printer. This involves threading the filament through the extruder and nozzle. The filament is the material that will be melted and deposited to create the 3D object. Correct filament loading ensures a smooth and consistent flow of material throughout the printing process.
Choosing the Right Filament

The Tevo Tarantula Pro can print with various filament types, including PLA, ABS, PETG, and TPU. PLA is a popular choice for beginners due to its ease of use and low odor. ABS offers greater strength and heat resistance, but requires a heated bed and enclosed environment. PETG offers a balance of strength and ease of printing. TPU is a flexible filament. Selecting the correct filament depends on your project requirements. Research the properties of each filament to choose the best option for your print.
Filament Loading Steps
First, insert the filament spool onto the spool holder. Cut the end of the filament at a clean 45-degree angle. Then, heat up the nozzle to the recommended temperature for your chosen filament (check the filament manufacturer’s recommendations). Insert the filament into the extruder and gently push it through until it comes out of the nozzle. Ensure the filament flows smoothly and consistently. If the filament doesn’t feed properly, check for clogs in the nozzle or adjust the extruder tension. Verify there are no obstructions preventing the filament from being fed through the system.
Slicing Your First 3D Model
Slicing is the process of converting a 3D model into instructions (G-code) that your 3D printer can understand. This involves using slicing software to prepare your model for printing, including setting print parameters such as layer height, infill, and supports. This step is critical for ensuring a successful print. Incorrect slicing can lead to failed prints.
Selecting a Slicer Program

Several slicing programs are available, including Cura, Simplify3D, and PrusaSlicer. Cura is a free and open-source option and is often recommended for beginners. Simplify3D is a more advanced, paid slicer that offers more control over the printing process. PrusaSlicer is another free option, developed by Prusa Research, known for its ease of use and excellent print quality. Choose a slicer that suits your experience level and printing needs. Make sure the slicer supports the Tevo Tarantula Pro.
Configuring Slicer Settings
Import your 3D model (STL or OBJ file) into the slicer. Configure the print settings, including layer height, infill density, print speed, and temperature. For beginners, use pre-configured profiles for your filament type and printer model. Experiment with different settings to optimize print quality. Lower layer heights produce smoother surfaces, while higher infill densities increase strength. Review the preview of the sliced model to check for any issues before generating the G-code. This will help you identify potential problems before you start printing.
Starting Your First Print
Once you have the G-code file ready, it’s time to start printing. This involves transferring the G-code to the printer and initiating the print job. Proper printer preparation and monitoring during the printing process are crucial for success.
Preparing the Printer
Insert the SD card containing the G-code file into the printer. Preheat the nozzle and bed to the correct temperatures for your chosen filament. Ensure the bed is level and clean, removing any debris or dust. Select the G-code file from the printer’s menu and initiate the print. The printer will begin by heating the nozzle and bed to the target temperatures, then starting the print process. These steps will ensure the printer is ready to print. Make sure to check that the printer is ready for the print process.
Monitoring the Printing Process
During printing, monitor the first layer adhesion and overall print quality. Watch for any signs of warping, stringing, or other defects. If necessary, make small adjustments to the bed leveling or nozzle height during the first layer. Keep an eye on the filament supply and temperature. Be ready to address any issues that may arise. If problems occur, you can pause the print to make adjustments. Successful printing often depends on close observation.
Post-Processing Your Print
After the print is complete, it’s time to remove it from the bed and perform any necessary finishing steps. This ensures the final product is clean, functional, and aesthetically pleasing.
Removing the Print

Allow the print to cool completely before removing it from the bed. Carefully detach the print, using a spatula or scraper if necessary. Be gentle to avoid damaging the print or the bed surface. Some prints may require more force to remove. Once the print is detached, inspect it for any support structures that need to be removed. Taking your time here can save you some problems.
Cleaning and Finishing
If your print has support structures, carefully remove them using pliers or a hobby knife. Sand down any rough edges or imperfections. You can also use various finishing techniques, such as painting, to improve the print’s appearance. Depending on the filament used, you might also need to perform post-processing steps, such as annealing or vapor smoothing. Proper post-processing will transform your 3D print from a raw product into a finished item. These final steps are important to creating the best possible print.
By following these 5 quick start tips, you’ll be well on your way to mastering your Tevo Tarantula Pro 3D yazıcı. Remember, 3D printing is a journey of experimentation and learning. With each print, you’ll gain experience and improve your skills. Happy printing!